
Astro Safarilift kit installation Instructions
|
Download the instructions here for a printer friendly version!
|
| ||
Front Sub-Frame Lift;
First remove parking lamps, grill, bumper cover, inner steel bumper, air cleaner, and fan shroud. Block rear wheels and unbolt L shaped parking brake cable bracket on driver side of the transmission cross member. With Van/Wheels on the ground (do not raise, lift with hoist or ramps, etc) Loosen all 6 sub-frame bolts and only remove the 3 bolts on the driver's side. With jack under the body/ headlight, lift body off sub-frame only enough to slide the 2" lifting spacers over top of the stock rubber mounts and install new longer bolts with stock washers, do not completely tighten. Then lower the jack and repeat on the passenger side of the van. With the van down on the ground remove 1 bolt at a time apply Loctite and tighten all 6 bolts completely. With Loctite torque bolts to; 14mm to 100 ft.lbs and 12mm to 60 ft.lbs.
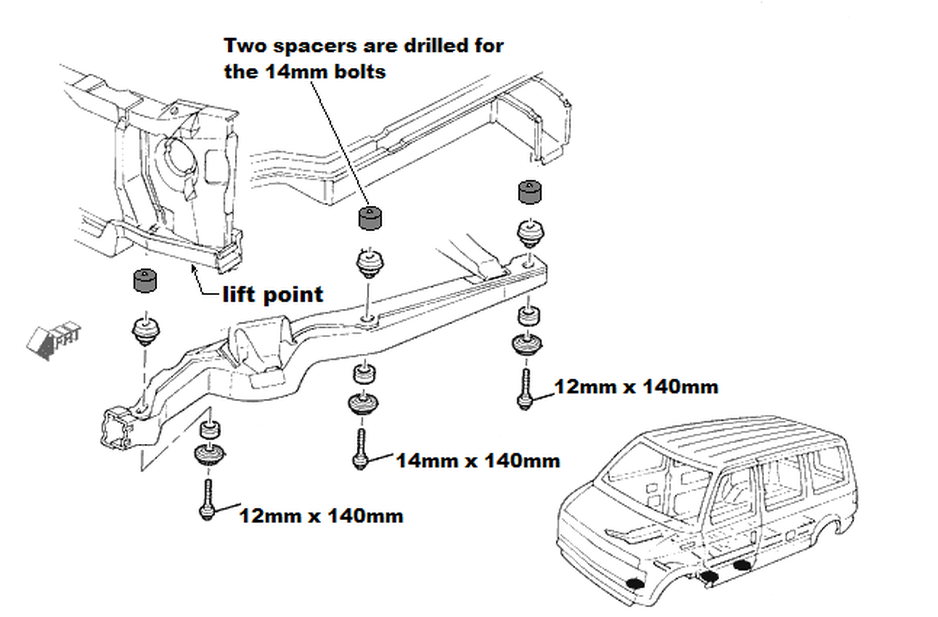
You may need to drill the L shaped parking brake cable bracket to relocate the brake cable or cut the triangle shaped bracket from the sub-frame (a saws-all works well for this) before bolting the bracket back to the body.
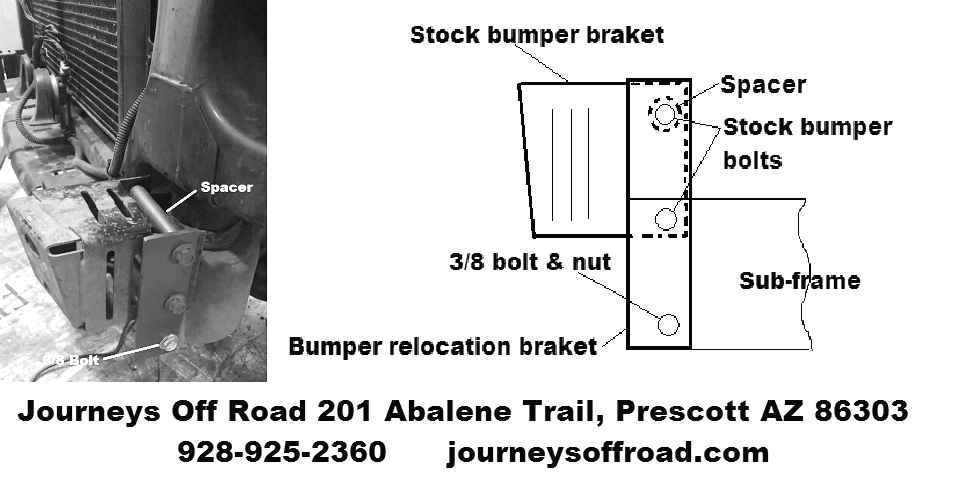
You can obtain an additional 1.5" to 2" of front end lift by adjusting stock torsion bar keys on the AWD models. Note, this will put your van out of alignment and will need to be realigned. First safely jack and support van with jack stands, to release tension on the torsion bars. Remove torsion bar key bolts, located on the bottom of transmission cross member. Clean the rust, dirt and lightly grease the threads and tip. Reinstall bolts and turn all the way in. lower the van to the ground, putting the load back on the torsion bars. Then turn bolts out equally, lowering to desired ride height. See illustration too assemble bumper bracket relocation kit. Then reinstall bumper and cover, grill and parking lights.
There are 3 ways to alter the fan shroud;
1. The most common is to cut the lower half out with a saw or tin snips so the fan will not hit or rub against the shroud.
2. Drop the lower half down to the sub-frame and zip tie to the lower hose and transmission line
3. Make 2" tall spacers/filler with thin sheet metal.
Rear Lift;
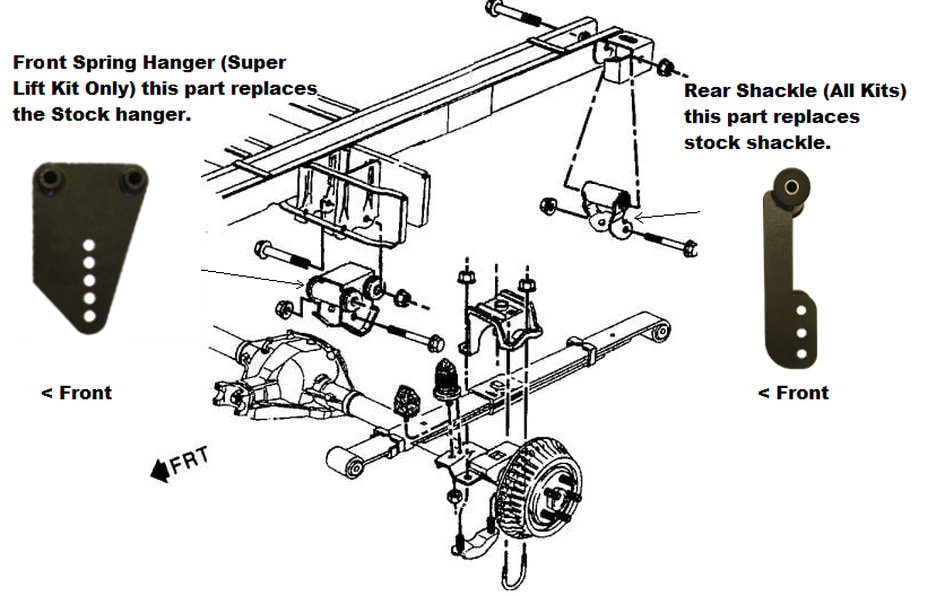
Safely jack the rear of the vehicle, place jack stands under frame. Remove spare tire. With floor jack under axle, raise or lower the axle to release pressure on the springs and shackles. Remove bolts from springs first, then the frame. Discard stock shackle. Lightly grease and install the new shackles into the frame with stock bolts. Jack the axle and springs up to the new shackles. Then replace the bolts and lower the van.
Super kit only;
Installing the Front spring hangers, unbolt the rear shocks from axle, replace one spring hanger at a time. On the driver's side only, the fuel tank is in the way of removing the spring hanger bolts. Slide bolts out a little and cut heads off with Saws-all, then the bolts can slid out. replace the cut bolts with the two 14mm x 160mm bolts that are included. Torque the 14mm spring hangers bolts to 133 ft.lbs. You can upgrade to the Super Kit anytime. Contact us for discount pricing.
Bumper relocation illustration;
Call our Tech Line for help on the installation, 7 days, 7am to 7pm AZ time at 928-925-2360
RECOMMENDATION: THIS KIT SHOULD BE INSTALLED BY A PROFESSIONAL MECHANIC.
WARNING: This vehicle now has been modified to enhance its performance. The steering, braking and handling of this vehicle may differ from standard passenger cars and trucks, This vehicle may also handle differently from an ordinary vehicle in driving conditions which may occur on streets, highways and off road. Avoid unnecessary abrupt maneuvers, sudden stops, sharp turns and other driving conditions that could cause loss of control, possibly leading to a roll over or other accident that could result in serious injury or death to driver and passengers, If larger tires are instilled the speedometer will read lower than the vehicles actual speed. WARRANTY: Journeys Off Road lift kits are warranted from manufacturers defects for the life of the vehicle. Warranty does not cover damage to the lift kit due to improper installation or use. Warranty issues will consist of replacement of the defect parts only and do not cover any labor costs or any other costs that were incurred. DISCLAIMER: Due to the inherent danger of modifying any vehicle from its stock configuration, Journeys Off Road is not responsible or liable for any damage to vehicle, property or persons when products is being installed, removed or in use.